Once your privacy settings are in place, customize Eventbrite to work best with the integration.
Learn how to integrate Eventbrite with Sched.
- Go to the Sched Control Panel > Registration tab.
- Click Tickets > Eventbrite > Continue.
- Select Connect to Eventbrite or click here > Log in to your Eventbrite account (if you haven’t yet) > Allow.
- After logging in, select which events to import and click Continue. You can sync registrants from up to three separate Eventbrite pages.
- Review the ticket types and number of tickets to be imported. Click Continue.
Note: Ticket holders will not be imported until you’re ready to go live and enable the sync.
- Once you’re ready for attendees to register for sessions, click Enable Eventbrite Sync to go live. Your existing registrants will be imported and sent an email to log in. Future registrants will be redirected to Sched after their purchase. They will also receive an email to set a password, allowing them to log in again later.
Customize Confirmation Message
Attendees are redirected to Sched after purchasing a ticket. You can edit the message that shows on the confirmation page.
1. Go to your Sched Control Panel Settings > Eventbrite.
2. Click Customize messaging.
3. Enter your text in the Confirmation Message field.
4. Click Save.
Note: This is for the Eventbrite Confirmation Message only. Go here if you want to customize your Welcome Invite Emails.
Disable Account Signup
Disable account signup to ensure only Eventbrite ticket-holders can sign into your event.
1. Go to Settings > General.
2. Check “Edit” in the privacy section.
3. Select the “Public site with invite-only login” option or “Private site with invite-only login.”
4. Click “Save.”
Disable Eventbrite Invite
You can disable the Sched welcome sent to attendees after you sync Eventbrite.
Attendees can activate their Sched profile using their email address and order number.
1. Go to the Communication Tab and click Messages in your Sched Control Panel.
2. Scroll down to Edit Automated Messages and click Eventbrite Invite.
3. Toggle off Enable welcome invites for Eventbrite orders.
4. Click Save
Collect Information For Each Ticket Holder
Each ticket holder needs a profile with a unique email address to create a custom schedule on Sched.
Attendees who buy many tickets, can enter email addresses for all tickets during checkout. After the purchase is complete, the buyer is logged into Sched, and other ticket-holders receive an email to log in.
By default, Eventbrite does not require information for each ticket holder. You must update this setting in your Eventbrite Control Panel.
- Go to Eventbrite and open your event.
- In the left menu, click Order Options > Order Form.
- Click Create Order Form (if needed).
- Select Each Attendee.
- Click the ticket type dropdown and choose All Ticket Types.
- You’ll see Name and Email fields are required by default these cannot be made optional.

Add Attendee Instructions & Enable Ticket Transfers (Optional)
To help attendees understand how to access Sched and manage their tickets, you can provide clear instructions and optionally allow them to transfer tickets if needed.
-
Go to your Eventbrite Control Panel
Navigate to:
Click your event→ Order Options → Order Form
-
Scroll to “Registration Options”
-
Add a message explaining that each ticket holder needs a unique email to create their schedule on Sched. This is also a good place to mention whether ticket transfers are allowed.
Sample Instruction:
“Each ticket holder must create their own schedule. If you’re purchasing multiple tickets, enter the email address for each ticket holder. After purchasing, schedule right away. Your friends will receive email instructions to log in and schedule their sessions.”
-
-
Enable Ticket Transfers (Optional)
-
Scroll to the bottom of the Order Form page.
-
Turn on: “Allow attendees to edit information after registration.”
-
This allows attendees to update the name and email address on their ticket if plans change, reducing your support requests.
-
-
If You Don’t Allow Transfers
-
Include a contact email address or phone number on the Eventbrite page or confirmation email so attendees can request manual changes.

-
Enable Sync
Once you’re ready for attendees to register for sessions, click “Enable Eventbrite Sync” to go live. Your existing registrants will be imported and sent an email to login. Future registrants will be redirected to Sched after their purchase. They will also receive the email to set a password so they can log in again later.
Here’s a sample of the email your attendees receive: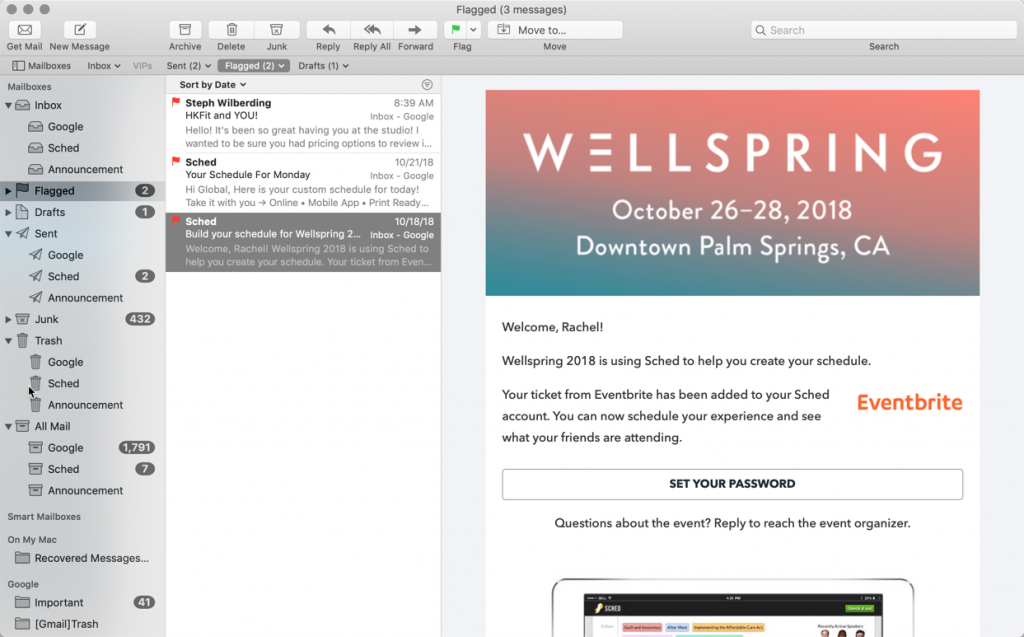
A tickets tab will now appear on your Sched site:
If your Eventbrite event is set to private, the tickets tab will not display.
Please note: After sync has started, the Eventbrite Order Confirmation will show the redirect URL back to Sched. This should never be modified, or the redirect to Sched won’t work anymore.
Disconnect Eventbrite
When you make changes to Eventbrite, Event Planners need to disconnect and reconnect Eventbrite from Sched to see the changes.
Note: Disconnecting your Eventbrite event will erase your ticket rules, so it would be best to document or screenshot these prior to disconnection.
Add-ons
You can sell add-on tickets (e.g., parking passes, camping reservations, merchandise, carbon offset, etc.) through Eventbrite along with other tickets to your event. These items will behave like all other tickets, where ticket purchasers will be imported into Sched as attendees, with their add-on items included.
Find out more about adding add-ons on Eventbrite here.
FAQs
1. How frequently does Eventbrite Sync?
It might take up to 4 hours to fully sync the 1st time, then every 15 minutes afterwards.
2. I made some edits to the tickets from Eventbrite(Added/Deleted a new ticket, change the ticket name) and it’s not syncing.
When changes are made in Eventbrite, you need to disconnect and reconnect the Eventbrite from Sched completely to see the changes. Please see the note above regarding disconnecting your Eventbrite event when using ticket rules.