- By Role (Everybody, Attendees, Speakers, Sponsors, etc)
- By Tag
- By Status (Waitlisted, Without a Schedule, etc)
- By Session
- By Registration and Ticket Status
- Individual Participants

Customizing Email Announcements
Step-by-Step Messaging Tutorial
Messaging by Role (Everyone, Attendees, Speakers, Sponsors, etc.)
Use this option to send general announcements such as registration details, parking instructions, or sponsor messages.
Steps:
-
Go to the Communication tab and select Messages.
-
Choose the participant role you wish to message.
-
Complete the subject and message fields.
-
Choose to send the message immediately or schedule it for later.

Messaging by Tag
Tags let you group participants (e.g., speakers, VIPs, first-time attendees) so you can send targeted messages.
Note: Tags are only visible to administrators.
Tag Rules
-
No quotes (“) or newlines
-
Under 255 characters
-
Separate multiple tags with commas
-
(Example: speaker, VIP, first-time attendee)
How to Send a Message by Tag
-
Go to the Communication tab and click Messages.
-
Under Message Type, select Attendees w/ a tag.
-
From the Send To dropdown, choose the tag.
-
(You’ll see how many people are tagged.)
-
Add your subject and write your message.
-
Choose to send now or schedule for later.

Need help adding tags? Check this guide on how to add People Tags.
Messaging by Status (Waitlisted, No Schedule, etc.)
Notify attendees who are waitlisted or have not added sessions to their schedule.
Steps:
-
Go to the Messages section.
-
Select the appropriate group from the Send New Message area (e.g., Waitlisted Attendees).
-
Fill out the message form.
-
Send immediately or schedule for later.

Messaging by Session
Send updates to participants of a specific session, such as time changes or cancellations. You can also filter by attendance or waitlist status.
Steps:
-
Navigate to the Schedule tab and click Sessions.
-
Select the relevant session.
-
Click Message.
-
Enter your subject and message.
-
Choose to send immediately or schedule for later.

Session emails will include your event’s header and the custom message content.

By Registration and Ticket Status
Use these message lists to send bulk messages to attendees, speakers, and buyers based on their registration or ticket status. This helps remind people to complete registration, assign tickets, pay invoices, or confirm they have a ticket.
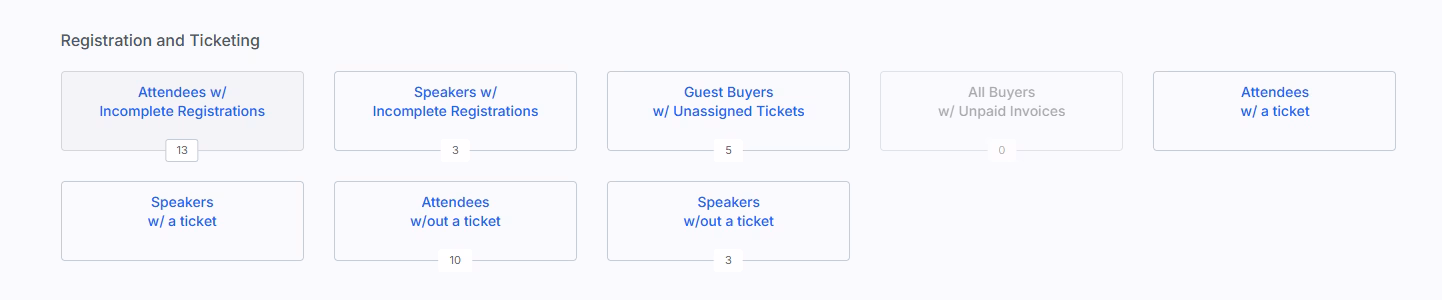
| Message List | Functionality |
|
Attendees w/ Incomplete Registrations |
Send a message to attendees who have not completed it yet. |
|
Speakers w/ Incomplete Registrations |
Send a message to speakers who still need to complete their registration. |
|
Guest Buyers w/ Unassigned Tickets |
Send a message to guest buyers who purchased tickets but have not assigned them to attendees yet. |
|
All Buyers w/ Unpaid Invoices |
Send a message to buyers who have unpaid invoices. This option may appear disabled when there are no unpaid invoices. |
|
Attendees w/ a ticket |
Send a message to attendees who already have a ticket assigned to them. |
|
Speakers w/ a ticket |
Send a message to speakers who already have a ticket assigned to them. |
|
Attendees w/out a ticket |
Send a message to attendees who do not currently have a ticket assigned to them. |
|
Speakers w/out a ticket |
Send a message to speakers who do not currently have a ticket assigned to them. |
Messaging Individual Participants
Reach out directly to attendees for personalized follow-ups, such as lost items or post-event communication.
Steps:
-
Go to the Attendees section or other role’s tab.
-
Click the attendee’s name.
-
Click Message.
-
Fill in the message form and send.

Message Log Management
You can monitor and manage all your email communications from the Message Log.
Note: Automatically generated emails (e.g., welcome invites, schedule reminders) are not included in the log and cannot be reviewed from this section.
To Access the Message Log:
-
Go to your event’s Control Panel.
-
Under the Communication tab.
-
Select Log.

Within the Message Log, you can:
-
View sent and scheduled emails.
-
Reschedule or delete pending emails.
-
Track delivery status and recipient details for manual messages only